- How to use this document – HR
- Module 1: Introduction to micro-gardening and sustainable urban design
- Module 2: Indoor micro-gardens and plants at your fingertips
- Module 3: Balcony, design, and garden gamification
- Module 4: Community gardens and garden as a social tool
- Module 5: Composting, zero-waste cooking, and personal action plan
- Annex I: Work materials
- Annex II: Prototypes of serious games
How to use this document – HR
Prijevod na hrvatski jezik uskoro će biti dostupan.
Offline (PDF) instructions
This curriculum is structured into five distinct modules, each containing three lessons, to guide a clear and progressive learning path. The table of contents is located at the start of the document and is hyperlinked, allowing you to click on any module or lesson title to navigate directly to that section within the document. To find specific keywords, activities, or concepts quickly, you can use your document reader’s built-in search function (typically Ctrl+F on Windows and ⌘+F on macOS and other Apple devices). The primary advantage of this offline version is its reliability and accessibility, ensuring you can use it to prepare for and deliver workshops in any setting, even in locations without a stable internet connection. The offline version (the PDF file) also allows you to print it out. However, for sustainability and environmental reasons, we highly recommend printing this document sparingly, if at all.
Online instructions
For a more interactive experience, the online version of this curriculum is available on the InclusiGardens project website. The online platform offers enhanced navigation, making it easy to switch between modules and access related resources from the e-Toolkit and e-Cookbook. It also includes accessibility features, such as options to adjust text size and contrast, select a dyslexia-friendly font, use the screen reader, etc. to better accommodate all learners. Furthermore, any external links and the digital feedback form are fully functional in the online version, providing a more connected and integrated experience for both trainers and participants.
Introduction
Welcome to the InclusiGardens Curriculum!
This programme is specifically developed for teachers, educators, and facilitators in the field of adult education who work with diverse learners, including those from vulnerable or marginalised groups. The curriculum translates the principles and practices from the InclusiGardens project’s e-Toolkit on sustainable urban micro-gardening and the zero-waste e-Cookbook into an engaging, hands-on learning experience. It is designed as a self-contained training programme, where all required information is provided within the sessions. To make the learning process more engaging and motivating, this curriculum introduces foundational gamification strategies and potential scenarios developed within the InclusiGardens project. This framework sets the stage for future serious games while transforming the current educational journey into a series of rewarding challenges.
The primary objective of this curriculum is to empower urban residents, particularly those who may be unemployed, have a low income, or face social exclusion with the practical skills and confidence to grow their own food in small, urban spaces. Through the practice of micro-gardening, the programme aims to enhance access to fresh, healthy food, promote environmentally sustainable lifestyles, and strengthen community bonds. For adult educators, this curriculum serves as a tool for fostering key competencies such as personal empowerment, social inclusion, and environmental stewardship among learners.
The curriculum is structured progressively to ensure a supportive and empowering learning journey for adult learners. It is founded on the pedagogical principle of starting small to build confidence and maintain motivation. The modules guide participants from fundamental concepts to practical applications, beginning with the simplest starting point, an indoor windowsill garden, before advancing to balcony gardening and eventually to collaborative community spaces. Each lesson builds upon the last, preparing learners for a successful and enjoyable venture into urban gardening while equipping educators with a clear, effective, and adaptable teaching framework. This structure deliberately incorporates time flexibility, permitting trainers to extend or shorten activities to serve the diverse learning speeds, interests, and needs of their participants.
The curriculum was designed for an enjoyable, educational and fulfilling learning journey that leads to all involved giving green thumbs up for learning!
Instructional notes on implementing this curriculum
This curriculum is designed for a hands-on, face-to-face workshop environment where experiential learning is vital. The trainer’s role is to facilitate activities, foster a supportive group dynamic, and provide individualised guidance. Key considerations include preparing the physical space by arranging tables for collaboration, ensuring all materials like soil, pots, and printed worksheets are pre-organised into kits for each participant, and using visual aids like flip charts and live plant examples to make concepts tangible. The trainer should prioritise clear, live demonstrations for all practical tasks and circulate throughout the room to offer personalised support, creating an inclusive and encouraging atmosphere that allows learners to build confidence through direct interaction with materials and peers.
Adapting this hands-on curriculum for an online setting requires careful planning to maintain engagement and practical learning. Before the course, the trainer must ensure all participants receive necessary materials, either by shipping pre-made kits or providing a detailed list of items to source. The training should be conducted on a user-friendly video conferencing platform, and all worksheets and resources must be provided in a digital format. The trainer must adapt activities for the virtual space, using tools like breakout rooms for small-group discussions, virtual whiteboards for brainstorming, and high-quality camera setups for clear demonstrations. To maintain interaction, the trainer should frequently use polls, the chat function, and encourage participants to share their progress on camera, transforming the practical activities into a shared, guided online experience.
Module 1: Introduction to micro-gardening and sustainable urban design
This foundational module introduces learners to the core concepts that underpin the entire programme. It explores the “why” behind urban gardening, connecting it to personal well-being, community resilience, and environmental sustainability. Participants will be introduced to the ethics and principles of permaculture as a design philosophy for creating efficient and harmonious systems. The module culminates in a practical planning session where learners use a structured, step-by-step process to observe their personal environment and create a realistic plan for their first micro-garden, ensuring the design is tailored to their specific space, resources, and goals.
Module plan
| Module title | Introduction to micro-gardening and sustainable urban design |
| Format | 3 lessons + a daily wrap-up |
| Module objective | By the end of this module, participants will understand the core principles of permaculture, identify different types of urban micro-gardens, and be capable of creating a foundational plan for their own gardening space. |
| Learning outcomes | Upon completion, learners will be able to: – Define the three core ethics principles of permaculture and provide a real-world example for each. – Differentiate between indoor, balcony, and community micro-gardens, listing key advantages of each. – Apply the first five steps of a structured design process (GOBRADIME) to create a preliminary garden plan. |
| Inclusivity and accommodation | Trainers should use clear and simple language, avoiding technical jargon. Key concepts and worksheets should be available in printed format for learners less comfortable with digital tools (if necessary). Ample time must be provided for individual and group activities, allowing learners to work at their own pace and ensuring a supportive, non-pressured environment. |
| Assessment and evaluation | Understanding will be assessed through active participation in group discussions, practical planning activities, and the final presentation of a simple garden plan. |
| Resources and materials | Projector, whiteboard or flip chart, markers, handouts with key concepts, a “My garden plan” worksheet, and selected guides adapted from the e-Toolkit (Module 1). |
| Educational principles | Learner-centred approach, learning by doing, problem-based learning, reflective practice, and application of knowledge to personal contexts. |
| Forms and methods of work | Whole-group discussion, individual work, small-group collaboration, hands-on planning activities. |
| Use of technology in class | A projector will be used to display images, key concepts, and simple guides adapted from the e-Toolkit. |
1.1. Permaculture and sustainability basics
| Lesson objectives | Participants will learn the three core ethics principles of permaculture. They will be able to define “circularity” and “resilience” in an urban context. |
| Forms of work | Whole-group and small-group discussion. |
| Methods of work | Interactive lecture, brainstorming, real-world example analysis. |
| Teaching aids | Whiteboard, markers, projector, simple handouts adapted from the e-Toolkit (Module 1). |
Lesson plan
| Trainer | Participant |
| Introduction The trainer begins with an engaging question: “What does living sustainably in a city mean to you?” The trainer then introduces the quote: “To plant a garden is to believe in tomorrow,” to set a hopeful tone and invite for a brief discussion. | Participants share their personal definitions and examples of urban sustainability. |
| Main part The trainer introduces permaculture as a design philosophy that mimics natural ecosystems. The three core ethics principles are explained simply: Earth care: Nurturing the planet.People care: Supporting each other.Fair share: Sharing surplus resources. The trainer clarifies that these are guiding principles for creating resilient and self-sufficient systems, not just gardens. | Participants listen to the explanation. In small groups, they brainstorm one local example for each ethic (e.g., a community recycling programme for Earth care, a neighbourhood watch for People care, a public fruit tree for Fair share). |
| Conclusion The trainer invites each group to share one of their examples. The session concludes by asking: “How can we apply these three ethics as we begin to design our own small gardens?” | Each group presents an example. Participants reflect on how these ethics connect directly to the act of gardening. |
1.2. Types of micro-gardens in urban environments
| Lesson objectives | Participants will be able to identify at least three types of urban micro-gardens. They will understand the primary advantages and limitations of each type. |
| Forms of work | Whole-group and small-group discussion. |
| Methods of work | Visual analysis, collaborative list-making, group presentation. |
| Teaching aids | Projector with images of diverse gardens, flip chart paper, markers, simplified information from the e-Toolkit (Module 1). |
Lesson plan
| Trainer | Participant |
| Introduction The trainer displays inspiring images from the e-Toolkit showcasing three distinct garden types: Indoor (windowsill), Balcony (container), and Community (shared plot). The trainer asks, “Which of these spaces feels most achievable for you right now?” | Participants view the images and share their initial impressions and preferences. |
| Main part The trainer provides a brief overview of each garden type, using simple descriptions from the e-Toolkit (e.g., “Indoor gardens offer quick results,” “Balcony gardens provide more creative space,” “Community gardens foster collaboration”). The participants are divided into three groups, with each assigned one garden type. | In their respective groups, participants create a two-column list: “Advantages” and “Limitations.” They consider factors like cost, required space, time commitment, and potential yield for their assigned garden type. |
| Conclusion The trainer facilitates a “gallery walk,” allowing groups to view each other’s lists. This is followed by a whole-group discussion on which garden type seems most suitable for their personal situations and why. | Participants review the findings of other groups. They contribute to the discussion, articulating which garden type best aligns with their individual circumstances. |
1.3. First steps in micro-garden cultivation
| Lesson objectives | Participants will learn the first five steps of a structured garden design process (GOBRADIME). They will apply these steps to create a simple, preliminary plan for their own space. |
| Forms of work | Group discussion, individual work, and partner sharing. |
| Methods of work | Guided instruction, worksheet completion, peer-to-peer feedback. |
| Teaching aids | Projector, a “My garden plan” worksheet, pens, and visual aids from the e-Toolkit (Module 1). |
Lesson plan
| Trainer | Participant |
| Introduction The trainer emphasises that thoughtful planning is the key to successful and stress-free gardening. The GOBRADIME framework is introduced as a simple “roadmap for your garden.” | Participants receive their “My garden plan” worksheet. |
| Main part The trainer guides participants through the worksheet, addressing each step based on the e-Toolkit’s methodology: Goals: “What do you want your garden to provide?” (e.g., fresh herbs for cooking, a relaxing green space).Observation: “Become a detective in your own home.” Participants are prompted to consider sun exposure, wind patterns, and water access.Boundaries: “Be realistic about your constraints.” This includes time, budget, and any landlord or building rules.Resources: “What can you use for free?” The trainer encourages thinking about upcycling items like yoghurt cups or egg cartons.Analysis: “Connect the dots.” A simple chart is provided to help match their observations and boundaries to a suitable garden type. | Participants complete their worksheets, reflecting on their personal environments and limitations. They use the provided chart to select an appropriate garden type and share their initial thoughts with a partner. |
| Conclusion The trainer asks a few participants to share one key insight or decision from their planning process. | Participants share highlights from their plan, such as, “I realised an indoor herb garden is the best fit for my busy schedule.” |
Reflection wrap-up
Reflection question: What did I learn today?
Activity: In small groups, participants present their “My garden plan” worksheets. Each person shares their primary goal and their chosen garden type, providing a brief justification. This reinforces the day’s learning and builds a sense of shared purpose.
Module 2: Indoor micro-gardens and plants at your fingertips
This module transitions from theory to practice, focusing on the most accessible starting point: the indoor garden. It is designed to be highly experiential, giving learners immediate, tangible results to build their confidence. Participants will learn the practical skills needed to cultivate fast-growing sprouts and microgreens, pot common herbs, and even regrow vegetables from kitchen scraps. The lessons also cover basic plant care, troubleshooting common problems, and simple propagation techniques, empowering learners with the foundational knowledge to keep their new indoor plants thriving.
Module plan
| Module title | Indoor micro-gardens and plants at your fingertips |
| Format | 3 lessons + a daily wrap-up |
| Module objective | Participants will learn to cultivate sprouts, microgreens, and herbs indoors. They will be able to establish a simple indoor garden, identify common problems, and understand basic plant care. |
| Learning outcomes | Upon completion, learners will be able to: – Successfully set up a jar for sprouting and a tray for microgreens. – Pot an herb seedling correctly and initiate the process of regrowing vegetable scraps. – Identify at least two common indoor plant problems and suggest a remedy. – Demonstrate a simple plant propagation method, such as taking a stem cutting. |
| Inclusivity and accommodation | Trainers must provide clear, step-by-step demonstrations for all hands-on activities. Materials should be pre-organised to ensure accessibility. For learners with motor skill difficulties, partners can be assigned for support. All instructions should be provided both verbally and in simplified, printed guides with clear visuals (if necessary). |
| Assessment and evaluation | Progress will be monitored through hands-on activities and group discussions. The module will conclude with a “show-and-tell” of the plants started during the workshop. |
| Resources and materials | Jars for sprouting, trays for microgreens, soil, seeds (e.g., alfalfa, radish, basil), spray bottles, small pots, simplified guides from the e-Toolkit (Module 2). |
| Educational principles | Experiential learning (learning by doing), active participation, observational learning, and problem-solving. |
| Forms and methods of work | Demonstrations, individual hands-on work, partner collaboration, group discussions. |
| Use of technology in class | A projector will be used to display clear images and simple charts from the e-Toolkit. |
2.1. Plants on the windowsill
| Lesson objectives | Participants will be able to select suitable herbs, greens, and houseplants for indoor cultivation. They will understand the light, water, and space requirements for different indoor plants. |
| Forms of work | Group discussion, partner work. |
| Methods of work | Example analysis, use of informational charts, collaborative planning. |
| Teaching aids | Projector, whiteboard, simplified plant information sheets from the e-Toolkit (Sections 2.5 & 2.6). |
Lesson plan
| Trainer | Participant |
| Introduction The trainer circulates pots of aromatic herbs like basil and mint, alongside easy-care houseplants like a spider plant. The opening question is: “What makes a plant a good roommate?” This initiates a discussion on the benefits of indoor plants. | Participants interact with the plants, sharing their familiarity and preferences. They discuss the positive aspects of having plants at home. |
| Main part The trainer presents simplified charts from the e-Toolkit detailing care requirements for herbs, leafy greens, and houseplants. Key information is highlighted, such as light needs (e.g., high sun for basil vs. low light for a snake plant) and pet safety. The participants are then divided into small groups. | In their groups, participants use the charts and their garden plans from Module 1 to select a “dream team” of three plants for their windowsill. They justify their choices based on their home environment, personal goals, and crucial safety considerations (e.g., “I chose mint for making tea, and avoided pothos because I share my apartment with a cat”). |
| Conclusion Each group presents their “dream team” to the other groups, explaining the rationale behind their selections. | Groups share their plant choices. Participants are encouraged to ask questions and offer suggestions to other groups. |
2.2. Sprouts, microgreens, and herbs
| Lesson objectives | Participants will learn the process for growing sprouts in a jar and microgreens in a tray. They will practise potting a small herb plant and learn how to regrow vegetables from kitchen scraps. |
| Forms of work | Demonstration, group rotation, individual planting. |
| Methods of work | Hands-on workshop. |
| Teaching aids | Jars, trays, soil, seeds (alfalfa, radish), small basil plants, green onion scraps, spray bottles, guides adapted from the e-Toolkit (Sections 2.1, 2.2 & 2.5). |
Lesson plan
| Trainer | Participant |
| Introduction The trainer offers samples of fresh sprouts and microgreens, describing them as “super-fast snacks” and “tiny plants with big flavour.” The basil plant and green onion scraps for the day’s activities are also introduced. | Participants taste the samples and comment on the flavours. They examine the materials for the workshop. |
| Main part The trainer establishes three activity stations. The participants are divided into three groups, which rotate through each station. Station 1 (sprouts): A guide is provided for growing sprouts in a jar. The trainer emphasises the “Safety first!” section regarding sanitation. Station 2 (microgreens): A guide is provided for growing microgreens in a tray. The trainer displays high-resolution visual aids on the projector (or shares screen) to clearly differentiate between healthy root hairs and mould. Station 3 (herbs and scraps): Each participant pots their own basil plant and places green onion scraps in water to regrow. | Participants engage in the hands-on activities at each station, setting up their sprouts, microgreens, potted herbs, and regrowing projects. |
| Conclusion The trainer provides a quick review of the take-home care instructions from the e-Toolkit. | Participants label their projects to take home and ask any final questions regarding care. |
2.3. Care, challenges, and best practices
| Lesson objectives | Participants will learn to identify and remedy common issues with indoor plants. They will learn three simple methods for propagating new plants from existing ones. |
| Forms of work | Demonstration, group discussion, Q&A session. |
| Methods of work | Example analysis, live demonstration, collaborative problem-solving. |
| Teaching aids | Live plants (e.g., pothos, spider plant), jars with water, small pots with soil, a clean knife, whiteboard, markers, guides adapted from the e-Toolkit (Sections 2.2, 2.6, 2.9). |
Lesson plan
| Trainer | Participant |
| Introduction The trainer displays images of plants exhibiting common problems (yellow leaves, leggy stems, powdery mildew) and asks, “What are these plants trying to tell us?” | Participants observe the images and hypothesise about the potential causes of the plant issues. |
| Main part Problem-solving: Using guides from the e-Toolkit, the trainer discusses common issues like over/under-watering, insufficient light, and pests.Propagation demo: The trainer demonstrates three easy propagation methods from the e-Toolkit: stem cuttings in water (using a pothos), leaf cuttings (explaining the process for succulents), and propagation by offshoots / runners (using the “babies” of a spider plant).Top tips: The trainer shares crucial advice, such as, “Pots must have drainage holes.” | Participants engage in the problem-solving discussion. They watch the propagation demonstration attentively and ask clarifying questions. |
| Conclusion The trainer reinforces the idea that plant loss is a natural part of the learning process. The session ends with an open Q&A. | Participants ask any remaining questions about their personal plants or the workshop projects. |
Reflection wrap-up
Reflection question: What does my ideal windowsill garden look like?
Activity: Participants conduct a small “show and tell” with the sprouts, microgreens, and herbs they started. They explain the setup and care instructions to their peers, which serves as a practical review of the day’s lessons.
Module 3: Balcony, design, and garden gamification
Building on the skills from indoor gardening, this module expands the learning environment to the balcony. This space introduces new variables such as weather, seasonality, and the need for more complex container solutions. Learners will engage in a creative design process, planning a layout that maximises their specific balcony’s potential using space-saving techniques. A key focus is on understanding the seasonal calendar for planting and harvesting. To enhance motivation and engagement, the module introduces the concept of gamification, guiding participants to frame their gardening journey as a series of fun, achievable missions and challenges.
Module plan
| Module title | Balcony, design, and garden gamification |
| Format | 3 lessons + a daily wrap-up |
| Module objective | Participants will be able to create a simple design for a balcony garden, understand a basic seasonal planting calendar, and devise creative ways to gamify their gardening experience. |
| Learning outcomes | Upon completion, learners will be able to: – Draw a simple, functional layout for a balcony garden, incorporating at least two space-saving techniques. – Use a provided chart to determine the appropriate planting time for three different vegetables. – Define the concept of gamification and create a personal “gardening mission” with a clear goal. |
| Inclusivity and accommodation | The design activity should focus on creativity rather than artistic skill; templates and rulers should be provided. The calendar activity should use simplified, visual charts. For the gamification brainstorm, the trainer should ensure all ideas are valued and encourage participation from quieter learners by using small group formats first. |
| Assessment and evaluation | Progress will be assessed through design activities, calendar planning, and group discussions. The module will conclude with participants sharing their balcony design, their plant timelines, and their “first gardening mission.” |
| Resources and materials | Large paper for drawing, markers, rulers, various types of pots (terracotta, plastic, fabric bags), guides adapted from the e-Toolkit (Module 3), and resources on gamification (e.g., mission creation worksheets, badge idea templates). |
| Educational principles | Creative expression, practical skill development, seasonal planning, and innovative engagement strategies (gamification). |
| Forms and methods of work | Group discussion, individual design work, peer feedback, gallery walk. |
| Use of technology in class | A projector to display inspiring images and simple charts from the e-Toolkit. |
3.1. Balcony garden design
| Lesson objectives | Participants will draw a simple layout for a balcony garden. They will learn about space-saving techniques and how to select appropriate containers. |
| Forms of work | Group discussion, individual drawing, peer feedback. |
| Methods of work | Hands-on design workshop, peer review (gallery walk). |
| Teaching aids | Large paper, markers, rulers, physical examples of different pots, guides adapted from the e-Toolkit (Sections 3.3, 3.4 & 3.5). |
Lesson plan
| Trainer | Participant |
| Introduction The trainer shows inspiring photos of balcony gardens from the e-Toolkit and prompts participants to recall their garden plans from Module 1. The question is posed: “How can we turn a limitation, like a small space, into a design opportunity?” | Participants review their notes from Module 1 and consider their application to a balcony. They share one challenge (e.g., “My balcony is very narrow”). |
| Main part The trainer facilitates a design workshop, presenting space-saving ideas from the e-Toolkit, such as vertical planters, railing pots, and trellises. A simple “pot guide” is shared to explain container selection (e.g., fabric bags for potatoes, terracotta for rosemary). | Participants create a simple floor plan of their own (or an imaginary) balcony on large paper. They must incorporate at least two space-saving techniques and label the types of containers they would use. |
| Conclusion The trainer organises a “gallery walk,” where all designs are displayed on the walls. | Participants circulate, view each other’s plans, and leave positive comments or questions on sticky notes. |
3.2. Sowing and harvesting calendar
| Lesson objectives | Participants will understand how seasonality and weather influence planting times. They will learn to use a simple calendar to schedule gardening tasks. |
| Forms of work | Group discussion, individual planning. |
| Methods of work | Example analysis, chart interpretation, planning activity. |
| Teaching aids | Projector, whiteboard, charts from the e-Toolkit (Sections 3.2 & 3.6). |
Lesson plan
| Trainer | Participant |
| Introduction The trainer asks, “When is the ideal time to plant tomatoes outside?” This question initiates a discussion about seasons and the risk of frost. | Participants share their existing knowledge and ideas. |
| Main part The trainer displays a simplified chart from the e-Toolkit indicating safe planting times for various vegetables based on nighttime temperatures. A more detailed annual calendar is then shown, using one plant (e.g., strawberry) to illustrate the full cycle of tasks (“Plant,” “Water,” “Harvest,” “Winterise”). | Participants select three different plants from the calendar. On a simple timeline, they draw or write the primary tasks for each plant throughout the year. |
| Conclusion The trainer shares “Pro tips” from the e-Toolkit, such as how to hand-pollinate zucchini to ensure fruit production. | In small groups, participants share their plant timelines and discuss how succession planting could ensure a continuous harvest. |
3.3. Gamification of the gardening experience
| Lesson objectives | Participants will understand the basic concept of gamification. They will brainstorm creative ways to make their personal gardening journey more engaging and game-like. |
| Forms of work | Group discussion, creative brainstorming. |
| Methods of work | Interactive lecture, ideation session. |
| Teaching aids | Whiteboard, markers, sticky notes, concepts adapted from the e-Toolkit (Section 2.9) and the project application; optionally – created vibe-coded serious games. |
Lesson plan
| Trainer | Participant |
| Introduction The trainer asks, “What makes a game enjoyable?” and lists responses on the board (e.g., challenges, points, rewards). It is explained that the project aims to apply these elements to gardening to enhance motivation. | Participants share what they enjoy about games. |
| Main part The trainer clarifies that this session serves as an introduction to the concept, utilizing the potential “game scenarios” created by the project as a foundational tool to test mechanics for future serious games. A brainstorming session is facilitated to generate ideas for: – Missions: (e.g., “Grow all the toppings for a pizza,” “Produce one bucket of compost”). – Badges: (e.g., “First harvest hero,” “Pest detective”). – Team quests: (e.g., “Trade a plant with a neighbour,” “Share a garden photo online”). Optional activity: Demo of beta version of vibe-coded serious games created as part of the InclusiGardens project. | Participants work in small groups with sticky notes to generate as many creative ideas as possible. They post their ideas on the whiteboard. |
| Conclusion The trainer asks each participant to review all the ideas and select their own “first gardening mission.” | Participants decide on and share their personal mission (e.g., “My mission is to grow enough mint for a week’s worth of tea”). |
Reflection wrap-up
Reflection question: What would be my first gardening “mission”?
Activity: Participants present their balcony garden designs and share the “first mission” they have just created. This exercise effectively demonstrates their ability to integrate their design with a motivational goal.
Module 4: Community gardens and garden as a social tool
This module shifts the focus from individual to collective action, exploring the potential of community gardens as powerful tools for social inclusion and neighbourhood revitalisation. Learners will discover how to identify and assess underutilised spaces in their own communities for potential garden projects. The curriculum emphasises the social benefits of shared gardening, discussing how these spaces can be designed inclusively to welcome people of all ages, abilities, and backgrounds. A key highlight is the introduction to the “food forest” concept, a low-maintenance, multi-layered garden that mimics a natural ecosystem, presented as an inspiring model for collaborative and sustainable urban agriculture.
Module plan
| Module title | Community gardens and garden as a social tool |
| Format | 3 lessons + a daily wrap-up |
| Module objective | Participants will understand the function and benefits of community gardens, learn about the “food forest” concept, and consider how they could participate in or initiate a shared gardening project. |
| Learning outcomes | Upon completion, learners will be able to: – Identify and map three potential locations for a community garden in their local area. – Articulate three distinct benefits (social, health, environmental) of community gardening. – Describe the concept of a “food forest” and name at least three of its layers. – Co-design a simple, inclusive community garden plan with a small group. |
| Inclusivity and accommodation | The map activity should use large, clear maps, and groups should be mixed to ensure diverse perspectives. During role-playing and design activities, the trainer must foster a safe environment for sharing ideas. The “food forest” concept should be explained using simple analogies and clear visual diagrams to ensure comprehension for all learning styles. |
| Assessment and evaluation | Progress will be assessed through group discussions and design activities. The module will conclude with participants presenting their proposal for a community garden in their own neighbourhood. |
| Resources and materials | Images of community gardens, diagrams of a food forest from the e-Toolkit, flip chart paper, markers, a map of the local area. |
| Educational principles | Collaborative learning, community-oriented thinking, introduction to advanced ecological concepts in a simplified manner. |
| Forms and methods of work | Group discussion, hands-on design, collaborative map analysis. |
| Use of technology in class | A projector to display images of community gardens and simplified diagrams. |
4.1. Types of community gardens
| Lesson objectives | Participants will be able to identify potential locations for community gardens in their neighbourhood. They will learn the initial steps for starting a shared garden project. |
| Forms of work | Group discussion, collaborative map analysis. |
| Methods of work | Example analysis, brainstorming, map-based activity. |
| Teaching aids | Projector, a local map, whiteboard, markers, information from the e-Toolkit (Section 4.1). |
Lesson plan
| Trainer | Participant |
| Introduction The trainer shares the quote: “The love of gardening is a seed once sown that never dies.” The trainer then asks, “What does the word ‘community’ mean to you?” while showing images of various community gardens. | Participants share their definitions of “community” and discuss the images. |
| Main part The trainer provides examples of underutilised urban spaces that could be converted into gardens, such as playground peripheries, rooftops, or vacant lots. A large map of the local area is displayed. | In small groups, participants act as “space detectives.” They examine the map and identify at least three potential locations for a community garden. For each location, they list one advantage (e.g., “It has good sun exposure”) and one challenge (e.g., “We would need to obtain permission”). |
| Conclusion Each group shares one potential location they identified. The trainer then outlines the initial steps for starting a project, such as “Talk to your neighbours or post a flyer in your building.” | Participants present their findings. They discuss the potential challenges and brainstorm possible solutions. |
4.2. Role and benefits of gardens for the community
| Lesson objectives | Participants will understand the social, health, and environmental benefits of a shared garden. They will be able to explain how a garden can be designed to be inclusive for all community members. |
| Forms of work | Group discussion, role-playing activity. |
| Methods of work | Example analysis, brainstorming, perspective-taking exercise. |
| Teaching aids | Projector, whiteboard, markers, short story cards describing different community members. |
Lesson plan
| Trainer | Participant |
| Introduction The trainer asks, “Besides food, what else can a garden grow?” Responses like “friendship,” “new skills,” and “well-being” are written on the board. | Participants brainstorm the non-food products of a garden. |
| Main part The trainer discusses the multifaceted benefits of community gardens, emphasising the project’s focus on including seniors, unemployed, jobseekers, minorities, and people with disabilities. The participants are divided into groups, each receiving a card with a short profile of a community member (e.g., an isolated senior, a low-income family). | In their groups, participants discuss how a community garden could positively impact the person on their card. They consider improvements to well-being, social connection, and access to fresh food. |
| Conclusion Each group shares how a garden could benefit their profiled person. The trainer leads a discussion on designing gardens to be welcoming and accessible to everyone. | Participants share their ideas and then brainstorm features for an inclusive garden (e.g., raised beds for wheelchair access, multilingual signage). |
4.3. Forest garden (“food forest”)
| Lesson objectives | Participants will understand the concept of a “food forest” and its distinct layers. They will collaborate with a group to design a simple food forest. |
| Forms of work | Group discussion, collaborative design activity. |
| Methods of work | Example analysis, collaborative design. |
| Teaching aids | Projector, a simplified diagram of food forest layers, large paper, markers, plant images from the e-Toolkit (Modules 3 & 4). |
Lesson plan
| Trainer | Participant |
| Introduction The trainer explains that a food forest is a garden designed to function like a natural, self-sustaining forest. The trainer asks, “What different types of plants do you typically find in a forest?” | Participants reflect on a natural forest ecosystem and share examples of different plant types (tall trees, shrubs, low-lying plants). |
| Main part The trainer displays a simple diagram illustrating the layers of a food forest: tall tree, shrub, herbs, groundcover, root layer, andvertical climbers (The trainer explicitly highlights that in urban micro-gardens, the vertical climber layer is particularly valuable for maximising limited space). The participants are divided into pairs or groups, with each assigned one layer. | Each group uses plant images from the e-Toolkit to select one or two appropriate plants for their assigned layer (e.g., the “Shrub” group might choose blueberries, while the “Groundcover” group chooses strawberries). |
| Conclusion The trainer asks each group to share their plant selection. A large food forest is drawn on the whiteboard, and each group adds their plant to the appropriate layer. | Groups present their choices and explain their suitability. The participants collectively “build” a visual representation of a food forest for their community. |
Reflection wrap-up
Reflection question: What would I change in my neighbourhood?
Activity: In small groups, participants create a simple “dream plan for an inclusive garden.” They select a location from the map and describe the type of garden, who it would serve, and one special feature (like a food forest element) that would make it beneficial for everyone.
Module 5: Composting, zero-waste cooking, and personal action plan
This final module brings the curriculum full circle, connecting the garden back to the kitchen and empowering learners to adopt a holistic, sustainable lifestyle. Participants will learn practical, small-space composting methods to transform kitchen scraps into valuable soil for their gardens. The focus then shifts to the kitchen, where the zero-waste e-Cookbook is introduced. Learners will explore simple techniques for reducing food waste, preserving harvests, and creatively using leftovers. The course culminates in the creation of a personal action plan, a critical step where each participant synthesises their learning into a set of simple, realistic, and self-directed goals to begin their micro-gardening and zero-waste journey immediately after the programme.
Module plan
| Module title | Composting, zero-waste cooking, and personal action plan |
| Format | 3 lessons + a daily wrap-up |
| Module objective | Participants will be able to differentiate between compostable and non-compostable materials, apply zero-waste cooking techniques from the e-Cookbook, and create a personal action plan to begin their micro-gardening journey. |
| Learning outcomes | Upon completion, learners will be able to: – Correctly sort a list of materials into “green” and “brown” compost categories. – Describe two methods for small-space composting (Bokashi and worm composting). – Identify zero-waste cooking techniques presented in the e-Cookbook. – Complete a personal action plan with at least one concrete step for their garden, kitchen, and community engagement. |
| Inclusivity and accommodation | The composting game should be tactile and interactive. Discussions about cooking and household habits must be facilitated in a non-judgemental manner, respecting diverse cultural and economic backgrounds. The action plan worksheet should use simple prompts and provide ample space for writing or drawing, accommodating different literacy levels. |
| Assessment and evaluation | Understanding will be assessed through a composting game and cooking discussion. The final presentation of a personal action plan will demonstrate their ability to apply learned concepts to create realistic first steps. |
| Resources and materials | Examples of “green” and “brown” compost materials, a demonstration compost bin, guides adapted from the e-Toolkit (Module 5) and the zero-waste e-Cookbook, and a “My action plan” worksheet. |
| Educational principles | Action-orientated learning, connecting garden-to-kitchen systems, fostering self-directed and sustainable habits. |
| Forms and methods of work | Demonstration, group activity, group discussion, individual planning. |
| Use of technology in class | A projector to display tips and recipes from the e-Cookbook and e-Toolkit. |
5.1. Zero-waste concepts and composting
| Lesson objectives | Participants will be able to distinguish between “green” and “brown” materials for composting. They will learn about two methods for composting in small spaces. |
| Forms of work | Group discussion, group activity. |
| Methods of work | Demonstration, sorting game. |
| Teaching aids | A simple chart of compostable materials, physical examples (apple core, newspaper), a Bokashi bin, a worm bin, guides adapted from the e-Toolkit (Section 5.1). |
Lesson plan
| Trainer | Participant |
| Introduction The trainer presents a simple chart from the e-Toolkit showing “GREENS” (e.g., fruit peels) and “BROWNS” (e.g., dry leaves). It is explained that composting is nature’s way of recycling food scraps into nutrient-rich soil. | Participants engage in a quick sorting game, categorising items like an apple core, shredded paper, and an eggshell into “GREENS” or “BROWNS” piles. |
| Main part The trainer demonstrates two small-space composting methods from the e-Toolkit: Bokashi: A sealed bucket system that “pickles” food scraps is shown and explained.Worm composting: A bin with specialised worms is shown, and their role in breaking down food scraps is explained. A list of materials that should NEVER be composted in traditional or worm bins (e.g., meat, dairy, pet waste) is reviewed. The trainer clarifies the exception for the Bokashi system, which can safely process meat and dairy due to its fermentation process. | Participants observe the demonstrations and are invited to examine the bins up close. They ask questions regarding odour, maintenance, and setup. |
| Conclusion The trainer leads a discussion on which method would be most suitable for different living situations (e.g., a small apartment vs. a home with a balcony). | Participants share their thoughts on which system would be most practical for them. |
5.2. Zero-waste cooking with the e-Cookbook
| Lesson objectives | Participants will be introduced to the InclusiGardens zero-waste e-Cookbook. They will learn simple techniques for reducing food waste, preserving food, and utilising leftovers. |
| Forms of work | Group discussion, interactive analysis. |
| Methods of work | Example analysis, collaborative discussion, recipe review. |
| Teaching aids | Projector to display pages from the digital zero-waste e-Cookbook. |
Lesson plan
| Trainer | Participant |
| Introduction The trainer introduces the zero-waste e-Cookbook with its motto: “All taste, no waste!” A key fact from the book is shared to stimulate thought: “Most food waste in the EU originates from households.” | Participants listen and reflect on their own household food waste. |
| Main part The trainer projects and discusses key ideas from the e-Cookbook: Cooking with leftovers: Simple ideas are shared, like making vegetable broth from peels or croutons from stale bread.Food preservation: A chart is shown on how to preserve garden harvests like basil or carrots.Practical tips: A few of the “20 practical tips” are highlighted, such as “Plan your meals” and “Create a ‘use-it-up’ box in your fridge.” | Participants actively join the discussion, sharing how they could apply these tips at home and brainstorming uses for their own leftovers. |
| Conclusion The trainer displays a simple recipe from the cookbook, such as “Sautéed zucchini with eggs.” | As a group, participants analyse the recipe and identify the zero-waste principles within it (e.g., “Use the zucchini peels,” “Serve with stale bread”). |
5.3. Creating a personal action plan
| Lesson objectives | Participants will reflect on the entirety of the course content. They will create their own simple, realistic action plan to begin their micro-gardening journey. |
| Forms of work | Individual work, group sharing. |
| Methods of work | Goal setting, worksheet completion. |
| Teaching aids | A “My action plan” worksheet, pens, and the e-Toolkit and e-Cookbook for reference. |
Lesson plan
| Trainer | Participant |
| Introduction The trainer explains that this final lesson is about translating knowledge into action, which is the ultimate goal of the project. | Participants receive their “My action plan” worksheet. |
| Main part The trainer guides participants in creating their personal plans. The worksheet includes simple prompts: My garden type: (Indoor, balcony, or community).My first 3 plants: (Based on space and preference).My first green habit: (e.g., “Start a compost jar,” “Make broth from scraps”).My first zero-waste recipe: (Selected from the e-Cookbook).My first community step: (e.g., “Ask a neighbour for a plant cutting,” “Find a local gardening group”). | Participants work individually to complete their action plans, using the project materials to make informed and personalised choices. |
| Conclusion The trainer asks everyone to review their plan and prepare to share one exciting commitment. | Participants finalise their plans and select one commitment to share with the group. |
Reflection wrap-up
Reflection question: What will I apply starting next week?
Activity: In a final, supportive circle, each participant shares their reflections on the overall programme and one commitment from their action plan. The trainer concludes the course with an encouraging message from the e-Toolkit: “Now, go get your hands dirty! We can’t wait to see what you grow. Happy gardening!” This serves as a final celebration of their learning journey.
Annex I: Work materials
Handout: Core permaculture principles (1.1.)
Permaculture is built on three core ethics: Earth care, People care, and Fair share. These ethics guide us in designing sustainable gardens and communities:
Earth care: Caring for the planet. This ethic is about nurturing the environment and respecting all living things. We look after soil, water, and wildlife, ensuring we give back to the Earth more than we take. For example, composting kitchen scraps and planting trees are Earth Care actions that help restore natural balance.
People care: Caring for ourselves and each other. This ethic focuses on supporting people and building healthy communities. It means ensuring everyone’s basic needs are met and fostering kindness and cooperation. In practice, People Care can be as simple as sharing gardening knowledge with a neighbour or creating inclusive garden spaces where everyone feels welcome.
Fair share (return the surplus): Sharing resources and limiting excess. This ethic means taking only our fair share and redistributing any surplus to benefit others and the Earth. In a garden, Fair Share might involve sharing extra harvest with the community or saving seeds to give to others. It reminds us to avoid waste and to ensure that the abundance we create is used wisely and fairly.
Worksheet: My garden plan (1.3.)
GOBRADIME design steps: Use this worksheet to plan your garden using the first five steps of the GOBRADIME process. Reflect on each prompt and fill in your ideas:
- Goals: What do I want from my garden? My top three goals for this garden are…
- Observation: Look carefully at your space. Three things I have observed about my space are…
- Boundaries: Acknowledge limitations. Key constraints (e.g. time, budget, rules) I have are…
- Resources: Identify what you can use. Free or available resources I can use include…
- Analysis: Connect your goals, observations, and resources to choose a suitable garden type. Based on the above, which type of micro-garden is the best match for you? Tick one:
☐ Indoor garden (for very small or indoor-only spaces, quick and easy starts)
☐ Balcony garden (for a small outdoor area, allows more variety in containers)
☐ Community garden (for shared space and larger projects, if no private space)
Hint: Indoor gardens suit limited space and time (e.g. a windowsill herb garden for quick access). Balcony gardens offer moderate space for creativity in containers. Community gardens are great if you have no private space or want to garden with others in a shared plot. Choose the option that best fits your situation and goals.
Instruction guide: Sprouting jar setup (2.2.)
Grow your own sprouts in a jar – a simple way to have fresh, nutritious greens in days. Follow these steps to start sprouts in a glass jar. Remember: sprouts are eaten raw, so cleanliness is very important!
Safety first! Always prioritise cleanliness when sprouting. Before you begin, wash your hands and sterilise the jar (wash with hot soapy water or boil it). Rinse your seeds before use. Keep all equipment clean and rinse seeds twice daily to prevent harmful bacteria growth. If sprouts develop a bad smell or appear slimy, do not consume them.
You will need: A clean glass jar (about 1 litre), a mesh lid or piece of cheesecloth with a rubber band, sprouting seeds (e.g. alfalfa, mung bean, radish), and clean water.
Steps to grow sprouts:
- Measure and soak: Place about 1–2 tablespoons of sprouting seeds in the jar. Add cool water until the seeds are well covered (about 5–7 times more water than seeds). Cover the jar mouth with the mesh or cloth and secure it. Let the seeds soak for about 8 hours (overnight) at room temperature.
- Drain and rinse: After soaking, drain the water through the mesh top. Refill the jar with fresh water and swirl gently to rinse the seeds, then drain again thoroughly. Tip the jar to an angle (about 45°) with the mouth facing downwards to allow excess water to drip out (for example, prop it in a bowl or dish rack). This keeps seeds moist but not sitting in water.
- Initial storage: Place the drained jar in a dark or dim place, still tilted upside-down. This simulates soil darkness and helps seeds germinate. Ensure air can circulate through the mesh.
- Rinse twice daily: Every morning and evening, rinse the seeds/sprouts with fresh cool water. Swirl them gently, then drain well and prop the jar back at an angle. Keeping the sprouts rinsed and drained is key to preventing mould and providing moisture.
- Watch them grow: After about 2 days, you’ll see little sprouts. At this point, you can move the jar to a lighted area (a windowsill with indirect light) so the sprouts develop green leaves (chlorophyll). Continue the rinse-and-drain routine twice daily.
- Harvest: In 4–6 days (varies by seed type), your jar should be full of crisp sprouts ready to eat! Once sprouts are 3–5 cm long and have tiny green leaves, give them a final rinse. Drain well, then enjoy your sprouts.
- Store: If not eating immediately, ensure the sprouts are thoroughly drained and relatively dry, then transfer them to a covered container lined with a paper towel and keep them in the refrigerator. They stay fresh for ~3–5 days. Do not continue to rinse them in the fridge, as excess moisture causes rapid spoilage.
Instruction guide: Microgreens tray setup (2.2.)
Microgreens are baby plants grown in a shallow tray – slightly larger than sprouts and packed with flavour and nutrients. This guide will help you grow microgreens successfully, and teach you how to tell healthy roots from mould in your tray.
You will need: A shallow tray or container (~5–7 cm deep) with drainage holes, a waterproof base tray or plate, clean potting mix or coco coir, microgreen seeds (e.g. radish, sunflower, broccoli), a spray bottle of water, and light (sunny window or grow light).
Steps to grow microgreens:
- Prepare the tray: Place your tray on the base (to catch water). Fill the tray with ~3–4 cm of potting mix. Smooth it out gently and mist the soil with water until it’s evenly damp (not waterlogged).
- Sow seeds: Sprinkle microgreen seeds evenly across the entire soil surface. Aim for a dense coverage, but try not to let seeds pile up on each other. (For example, use roughly 1–2 teaspoons of radish seeds for a 15×15 cm tray, adjusting for seed size.)
- Press and cover: Use your palm or a piece of cardboard to press the seeds lightly into the soil, ensuring good contact. You can add a very thin layer of fine soil on top, or simply leave seeds exposed (many microgreens germinate well on the surface). Give a gentle mist of water on top.
- Dark germination period (optional): To encourage sprouting, you may cover the tray with a lid or cloth to keep seeds in the dark for the first 2–3 days. This can help seeds germinate evenly. Keep the tray in a warm spot out of direct sunlight during this time.
- Keep moist: Check the tray at least once a day. Using the spray bottle, mist the soil as needed to keep it moist. The seeds should begin to germinate in 2–3 days. (Do not let the soil dry out; microgreens need consistent moisture.)
- Uncover and light: Once most seeds have sprouted (tiny yellowish shoots will appear), remove the cover. Move the tray to a spot with good light, like a bright windowsill. The sprouts will turn green as they receive light. Ensure they get about 4–6 hours of light a day (or use a grow lamp).
- Water and grow: Water the microgreens carefully each day. It’s best to water from the bottom by pouring a little water into the base tray, letting the soil soak it up. If top-watering, use a gentle mist to avoid knocking over the delicate seedlings. Always drain excess water – the soil should be moist but not soaking. Good airflow (not trapping them under a humidity dome for too long) helps prevent mould.
- Monitor root health: You might notice white, fuzzy growth around the roots. Don’t panic – if it looks like tiny white hairs clinging to the root tips, these are likely healthy root hairs, not mould. Root hairs appear especially when the soil is a bit dry and will vanish when watered. Mould, on the other hand, looks like a cottony web spread across the soil and does not disappear if you mist it. Keep an eye (and nose) on your tray.
Healthy microgreen root hairs look like white fuzz on the roots and will disappear when wet, whereas true mould spreads like a spiderweb and stays even after watering. If you see mould (often accompanied by a sour smell), remove the affected section and improve ventilation.
- Harvest time: Most microgreens are ready to harvest in about 7–14 days, depending on the variety. They are typically 5–10 cm tall and have opened their first set of leaves. To harvest, use clean scissors to cut the stems just above the soil surface. Harvest as needed – microgreens taste best fresh.
- After harvest: You can compost the leftover root mat and potting mix (they act as a great organic addition to your compost bin). If you plan to grow another batch in the same tray, use fresh soil to avoid any pathogen build-up. Clean the tray with soap and hot water before reusing.
Enjoy your microgreens! Rinse them in cool water and use in salads, sandwiches, or as a garnish. These tiny greens add a big nutritional punch and flavour to your meals. Happy growing!
Chart: Indoor plant “dream team” selector (2.1.)
Not sure which plants to grow indoors? Use this simple chart to pick a “dream team” of indoor plants for your space. It compares common easy-care plants, so you can choose ones that match your light conditions, watering habits, and pet situation (some plants can be toxic to pets). Select a few that fit your home, and you’ll have a winning team of plants for your windowsill!
| Plant | Light needs | Water needs | Pet-friendly? |
| Basil (herb) – a fragrant culinary herb. | High: prefers 6+ hours of direct sun (bright window). | Moderate: water regularly; likes moist soil but good drainage. | Yes: safe for cats and dogs. |
| Mint (herb) – hardy, fast-growing herb. | Medium: bright indirect light or partial sun is fine. | High: likes consistently moist soil (water frequently). | Yes: non-toxic to pets (and they often enjoy sniffing it). |
| Snake plant (sansevieria) – air-purifying houseplant. | Low to bright: tolerates low light; also does well in indirect bright light. | Low: water sparingly (about once every 2–3 weeks). avoid overwatering. | No: toxic to pets if ingested. |
| Spider plant – easy-care hanging plant. | Low to medium: grows in moderate light or partial shade. | Moderate: water about weekly; do not let soil completely dry out. | Yes: safe for cats and dogs (cats may nibble it with no harm). |
| Pothos ivy (devil’s ivy) – trailing vine. | Low to medium: thrives in indirect light; avoids direct sun. | Moderate: water when top soil dries; generally once a week. | No: toxic to pets if ingested (keep out of reach). |
| Rosemary (herb) – woody aromatic herb. | High: loves full sun (a bright south-facing window). | Low: drought-tolerant; water when soil is quite dry. | Yes: non-toxic to pets (has a strong scent that may even deter some pets). |
How to use the chart: Pick a few plants that match your home conditions. For example, if you have a sunny kitchen window and no pets, basil and rosemary would thrive there and give you fresh herbs. If you have low light in your living room, a snake plant or pothos will still grow well (just be careful if you have pets). If you want pet-safe options, choose from the herbs or a spider plant. Mix and match up to three plants to start your indoor garden “dream team” – plants that you will enjoy and that will do well in your space.
Worksheet: Balcony garden design template (3.1.)
Use this worksheet to design a balcony garden for a space measuring approximately 1 metre by 3 metres. Each square on the grid represents 10×10 cm, with the intended design area spanning 10 rows × 30 columns (1m deep × 3m wide). The grid contains extra space beyond this size to allow for flexibility. If your actual balcony is smaller than the provided area, please cross out or blacken any unused fields. If your balcony is larger, feel free to extend your drawing beyond the grid lines or use the following page to sketch the remainder of your layout.
Design checklist
☐ My layout includes at least two space-saving techniques, such as:
• Vertical planter (e.g. stacked shelves, hanging pockets)
• Hanging basket
• Trellis for climbing plants
• Railing planter
☐ I have included at least three types of plants:
• ________________________________
• ________________________________
• ________________________________
☐ I have left space to move around and water my plants.
☐ My plan matches the amount of sun/shade my balcony receives.
☐ I labelled all important features on the grid (e.g. ‘table’, ‘pots’, ‘vertical planter’).
| 300 | ||||||||||
| 290 | ||||||||||
| 280 | ||||||||||
| 270 | ||||||||||
| 260 | ||||||||||
| 250 | ||||||||||
| 240 | ||||||||||
| 230 | ||||||||||
| 220 | ||||||||||
| 210 | ||||||||||
| 200 | ||||||||||
| 190 | ||||||||||
| 180 | ||||||||||
| 170 | ||||||||||
| 160 | ||||||||||
| 150 | ||||||||||
| 140 | ||||||||||
| 130 | ||||||||||
| 120 | ||||||||||
| 110 | ||||||||||
| 100 | ||||||||||
| 90 | ||||||||||
| 80 | ||||||||||
| 70 | ||||||||||
| 60 | ||||||||||
| 50 | ||||||||||
| 40 | ||||||||||
| 30 | ||||||||||
| 20 | ||||||||||
| 10 | ||||||||||
| cm / cm | 10 | 20 | 30 | 40 | 50 | 60 | 70 | 80 | 90 | 100 |
Worksheet: My first gardening mission (3.3.)
Gardening can be more fun when you turn it into a game. Define your first personal gardening “mission” – a creative, motivating goal for yourself. Give it a clear goal, list a few steps to achieve it, and decide on a reward for when you succeed. This will be your first gardening challenge to tackle, inspired by gamification principles from the lesson.
(For example, a mission could be “Grow all the toppings for a pizza,” which might involve steps like planting tomatoes and basil, and the reward could be hosting a pizza party with the harvest!)
My gardening mission:
Goal (what I want to achieve):
Steps to complete the mission:
1.
2.
3.
(List 3 simple steps or actions you will take to accomplish your mission.)
Reward: ___________
(What treat or reward will you give yourself once you finish? Make it fun and relevant – like enjoying the produce, sharing with a friend, or buying yourself a new plant.)
Now put it all together and make it inspiring. For example, you might write: “Mission: Grow a salad bowl. Steps: 1) Plant lettuce seeds in a pot; 2) Water daily and protect from pests; 3) Harvest in 4 weeks. Reward: Make a big home-grown salad and invite a neighbour to enjoy it with me.”
Make your mission challenging but achievable. It should excite you and give you a clear path to follow. Good luck on your first gardening quest!
Role-playing cards: Community member profiles (4.2.)
In this activity, you will receive a card describing a community member who could benefit from a community garden. Work in groups to discuss how a garden might help the person on your card. Consider their needs and what garden features or programmes would benefit them (for example, raised beds for someone in a wheelchair, or children’s activities for a family).
Cut out the profile cards below (or your trainer will distribute them). Each card is a short, anonymised profile of a community member. Step into their shoes and think about what a community garden could offer them. Each profile highlights a different potential user of a community garden – seniors, families, people with disabilities, those facing unemployment, newcomers, etc. – reflecting the diverse needs a community garden can meet.
Instructions: In your group, discuss the person’s situation and list ways the community garden could help them. Think in terms of well-being, social inclusion, food access, and skill-building. After discussion, share with other participants: How would joining or having a community garden impact this person’s life? and What could you include in a garden design to accommodate them? This role-play will help us design gardens that are welcoming and beneficial for everyone in the community.
Community member profiles:
- An isolated senior who lives alone. – (This person might be looking for social interaction and a safe place to be active outdoors.)
- A young, low-income family with children. – (This family might benefit from affordable fresh food and a kid-friendly outdoor space.)
- A person with limited mobility (uses a wheelchair). – (They may need wheelchair-accessible paths and raised garden beds to participate.)
- An unemployed adult seeking purpose and community. – (This individual might gain skills, confidence, and social connections by volunteering in the garden.)
- A recently arrived immigrant who used to garden back home. – (They could grow familiar vegetables from their culture and meet neighbours, helping them feel more at home.)
Activity resource: Composting sorting game (5.1.)
Learn what belongs in a compost bin with this interactive sorting game! You have a set of item cards representing different types of waste. Your task is to sort these items into the correct category: green compostables, brown compostables, or not compostable.
- Green = soft, “wet” organic waste that is high in nitrogen (for example, fresh fruit or veggie scraps).
- Brown = dry, woody or paper-based waste that is high in carbon (for example, dried leaves or newspaper).
- Not compostable (for standard/worm bins) = items that do not break down safely or attract pests (for example, plastics, or meat/dairy). Note: Meat/dairy can only be processed if using the Bokashi method.
How to play: Cut out the cards below (or gather similar real items if available). Then, place each item into the pile or bucket for green, brown, or not compostable. Work as a team and decide where each item goes. After sorting, check with the answer key or facilitator to see if you were right and discuss why each item belongs or doesn’t belong.
After sorting, discuss: Why are greens and browns both needed in traditional outdoor compost? (Hint: balancing greens and browns helps the compost break down and not smell). Note for trainer: Explicitly clarify that while this rule applies to community or outdoor bins, the Bokashi method demonstrated earlier does not require balancing browns, and worm bins use browns primarily as bedding rather than for thermal carbon balance.
This game makes learning composting simple: If it was once alive (plant or paper) and not too oily or dairy/meat, it’s probably compostable! And remember, composting is nature’s way of recycling nutrients – turning your kitchen and garden waste into rich soil. Have fun sorting!
Waste item cards (to sort):
| Apple core (fruit waste) | Plastic bottle (empty PET bottle) | Dry leaves (a handful of brown, dried leaves) |
| Meat bone (e.g. a chicken bone) | Vegetable peels (mixed kitchen veggie scraps) | Cardboard piece (piece of a cardboard box) |
| Used coffee grounds (and paper coffee filter) | Aluminium soda can (empty metal can) | Shredded newspaper (a strip of newsprint paper) |
Worksheet: My personal action plan (5.3.)
You’ve learned a lot about micro-gardening, sustainability, and zero-waste living. Now it’s time to turn that knowledge into an action plan for yourself! This worksheet will help you commit to at least one concrete, achievable action in three areas of your life: your garden, your kitchen, and your community. These are your personal next steps to continue what you’ve learned once the course is over.
Instructions: For each category below, write down one specific action or goal you will accomplish. Choose something realistic that you can start soon – even tomorrow! We’ve provided an example for each to spark ideas.
- In my garden, I will… (For example: “Start a small Bokashi or worm compost bin on my balcony by the end of this month” or “Grow my own basil and parsley in pots this spring.”)
– _____________ - In my kitchen, I will… (For example: “Plan meals to use up leftovers twice a week” or “Try one recipe from the zero-waste cookbook each month.”)
– _____________ - In my community, I will… (For example: “Volunteer at the community garden once a month” or “Share extra veggies/herbs with my neighbours.”)
– _____________
Take a moment to make sure each action is S.M.A.R.T. – specific, measurable, achievable, relevant, and time-bound. For instance, instead of saying “I’ll grow some vegetables,” a better plan is “I will grow 5 tomato plants in containers this summer.” This way, you can clearly track your progress.
Empower yourself: These commitments are your personal way to carry forward the InclusiGardens project’s goals into your daily life. Keep this sheet somewhere visible (like your fridge or notice board) as a reminder. You might even share your plan with a friend or family member to stay accountable.
Finally, remember that even small actions matter. By writing down at least one goal for your garden, kitchen, and community, you are setting the stage for continuing your sustainable urban gardening journey beyond this course. Good luck, and happy gardening (and cooking, and sharing)! Every big change starts with a small first step – you’ve got this!
Annex II: Prototypes of serious games
The integration of gamification into adult education represents a transformative approach to engaging vulnerable urban populations, particularly when addressing complex and interconnected subjects such as sustainable living, urban micro-gardening, permaculture ethics, and social inclusion. As established throughout the foundational modules of this curriculum, traditional instructional methods – while effective for information transmission – often require significant supplementation to maintain long-term learner motivation, overcome linguistic or prior educational barriers, and build a genuine, organic sense of community among very diverse learners. To address these deep pedagogical challenges, a series of serious game prototypes has been developed as a core component of the learning journey in InclusiGardens. These prototypes serve as interactive, experiential learning environments where participants can immediately apply theoretical knowledge from various InclusiGardens results and outputs – ranging from balcony design to zero-waste cooking – within a low-stakes, extremely engaging, and supportive framework.
The conceptualisation and development of these serious games operate on the foundational pedagogical principle that play is a universal mechanism for deep learning, transcending cultural, economic, and age-related boundaries. By systematically translating the core tenets of permaculture, complex resource management, and cooperative community building into accessible game mechanics, educators can successfully bypass traditional barriers to entry that often block adult education programmes. The following sections detail the prototypes developed for this curriculum, beginning with digital experiences engineered through innovative artificial intelligence frameworks – designed for individual assessment and initial conceptual bridging – and culminating in a comprehensive, cooperative tabletop physical game carefully designed to maximise interpersonal communication, collaborative problem-solving, and the practical application of the fair share ethic.
Note: The serious games presented here should be viewed solely as prototypes / beta versions of the gaming experiences, as they lack polish that fully tested games exhibit. These prototypes were originally created in English and subsequently machine-translated into Croatian, Slovenian, and Dutch. Keeping these limitations in mind, the limited testing during the pilot activities showed that these serious games, even in this form, engage and motivate learners, and together with other, traditional approaches to instruction, show promising results in terms of teaching and learning green topics, including those addressed in the InclusiGardens project.
Online vibe-coded games
The digital prototypes utilised in this curriculum represent a significant technological, financial, and pedagogical milestone for adult education, having been developed using the rapidly emerging method known as vibe coding. Coined in February 2025 by computer scientist Andrej Karpathy, a former artificial intelligence leader at Tesla and co-founder of OpenAI, vibe coding describes a new software development process wherein the user expresses desired outcomes, aesthetics, and logic in natural language, while large language models (LLMs) autonomously generate the underlying code architecture. The cultural and technological impact of this shift was cemented in 2025, when the term was officially recognised by Merriam-Webster as a trending expression and was subsequently named the Collins English Dictionary Word of the Year for 2025.
For the educational sector broadly, and specifically for adult education institutions such as POU, vibe coding democratises the creation of customised digital learning tools. Historically, the development of serious games required substantial financial resources, specialised software engineering teams, and protracted development cycles spanning months or years, which often placed such impactful tools entirely out of reach for non-profit organisations, community programmes, and localised adult education programmes. Vibe coding fundamentally bypasses these traditional bottlenecks, allowing educators, curriculum designers, and facilitators to act directly as creative directors. By describing pedagogical goals, specific game mechanics, and desired user interfaces in plain, everyday language, and uploading existing resources as a source of truth, educators can generate functional software prototypes in a fraction of the time. This capability aligns with Erasmus+ objectives, which heavily emphasise digital innovation, universal accessibility, and the rapid, cost-effective dissemination of digital tools to enhance teaching methodologies across European borders.
The prototypes presented below currently function as Version 0.1 iterations. As noted by software developers, vibe coding is an exceptional and unmatched tool for building initial prototypes to test ideas, validate educational mechanics, and gather immediate feedback from early users, even if the resulting code is not immediately solid enough for massive-scale, commercial production without further human developer intervention. However, within the controlled, specific context of serious games designed for localised educational workshops targeting vulnerable populations, these technicalities are heavily outweighed by the deep benefit of immediate, testable deployment. The ability to rapidly iterate a digital game based on live, in-the-room feedback from adult learners ensures that the final educational product is extremely adapted to their specific cognitive requirements, visual accessibility needs, and linguistic preferences. The following three online games demonstrate the immense versatility of vibe coding in creating targeted, objective-driven educational experiences that directly mirror and reinforce the learning outcomes of the broader micro-gardening curriculum.
Green balcony challenge
Ready to get your hands dirty? Your balcony is a blank canvas! Show your green-thumb skills by answering questions about 5 different plants. For each plant you successfully grow, you’ll earn a shiny star. Let’s transform your space into a lush, urban oasis!
Link: https://inclusigardens.pou-cakovec.hr/game/

The Green balcony challenge is logically designed as an entry-level digital assessment tool that directly correlates with the specific learning objectives established in Module 3 of the curriculum regarding container gardening, space optimisation, and basic plant selection. Pedagogically, this prototype leverages the psychological framework of immediate positive reinforcement, a crucial element when engaging adult learners who may have negative historical associations with formal educational testing. The acquisition of a shiny star upon successfully answering questions about specific plant care requirements serves as a digital badge within the game environment. For adult learners, particularly those who may have experienced prior educational disenfranchisement, social marginalisation, or long-term unemployment, the immediate, gamified validation of knowledge builds critical self-efficacy and confidence.
The game’s overarching narrative – transforming a blank canvas into a lush, urban oasis – directly mirrors the real-world GOBRADIME (Goals, Observation, Boundaries, Resources, Analysis, Design, Implementation, Maintenance, Evaluation) design process taught extensively in the initial workshops. By asking learners to systematically manage 5 different plants, the game introduces the fundamental ecological concept of biodiversity within a strictly confined spatial footprint. The questions presented within the game architecture are logically designed to test the learner’s comprehension of vital horticultural variables such as light requirements, watering frequencies, and container depth, all of which are absolutely necessary for the survival and thriving of balcony plants. The intentional simplicity of the user interface, enabled and streamlined by the vibe coding development process, ensures that the learner’s cognitive load is focused entirely on the educational horticultural content rather than the frustration of navigating complex, convoluted game controls. This targeted simplicity makes the Green balcony challenge an ideal, low-stress primer before participants begin the physical, tactile task of mapping out their own balcony designs on paper during the workshop sessions.
Green skyscraper
You’re a building manager on a mission! Your goal is to identify which tenants are Green (eco-conscious) and which are Unsustainable (practising unsustainable habits). Use the clues to deduce each tenant’s status. By identifying tenants with unsustainable habits, you can help them become as green as their fellow tenants. Don’t worry, InclusiGardens educational materials are fun to use! You cannot guess! The game only allows you to make a choice if it is 100% logically provable.
Link: https://inclusigardens.pou-cakovec.hr/game2/
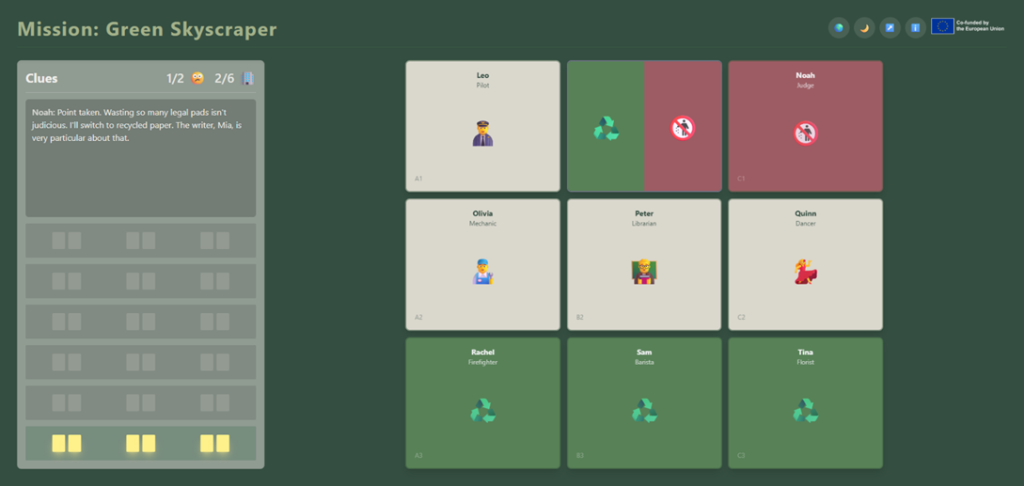
Green skyscraper introduces a significantly higher level of cognitive complexity to the learning journey by framing urban sustainability as a rigorous deductive logic puzzle. In this specific prototype, the player is intentionally placed in a position of authority, responsibility, and community oversight – a building manager. This role-playing element inherently promotes a deep sense of agency, civic duty, and community stewardship among participants. The core gameplay mechanic revolves entirely around utilising detailed, contextual clues to accurately differentiate between Green and Unsustainable tenants residing within the vertical community. This exactly mirrors the real-world observational and analytical skills required in sustainable urban design and permaculture, where practitioners must critically assess environments, identify resource inefficiencies, and implement corrective measures based strictly on observable, empirical data rather than assumptions.
The strict rule that choices cannot be guessed and must be 100% logically provable forces adult learners to actively practise scientific reasoning, systematic hypothesis testing, and the process of logical elimination. This rigorous cognitive exercise is directly and immediately applicable to the troubleshooting phases of indoor and balcony gardening taught in Module 2, where a learner must deduce exactly why a plant is failing (e.g., distinguishing between the identical-looking symptoms of root rot from overwatering versus wilting from insufficient light) based purely on visual clues and environmental logic.
The thematic dichotomy of Green versus Unsustainable habits seamlessly integrates the curriculum’s later modules on zero-waste cooking, energy conservation, and small-space composting. By identifying specific unsustainable practices within the safe confines of the game’s narrative, players learn to recognise and audit similar habits in their own daily lives without feeling personally attacked or judged. Crucially, the game frames the ultimate resolution not as punishing, evicting, or shaming the unsustainable tenants, but rather as helping them transition to eco-conscious practices through education and support, thereby deeply reinforcing the curriculum’s overarching themes of empathy, social inclusion, and the foundational permaculture ethic of People care.
Windowsill wonders
Cooperative InclusiGardens Game. Work together with 3 neighbours to build the best community garden. Collect sets of resources, negotiate for supplies, and help each other out!
Link: https://inclusigardens.pou-cakovec.hr/game3/
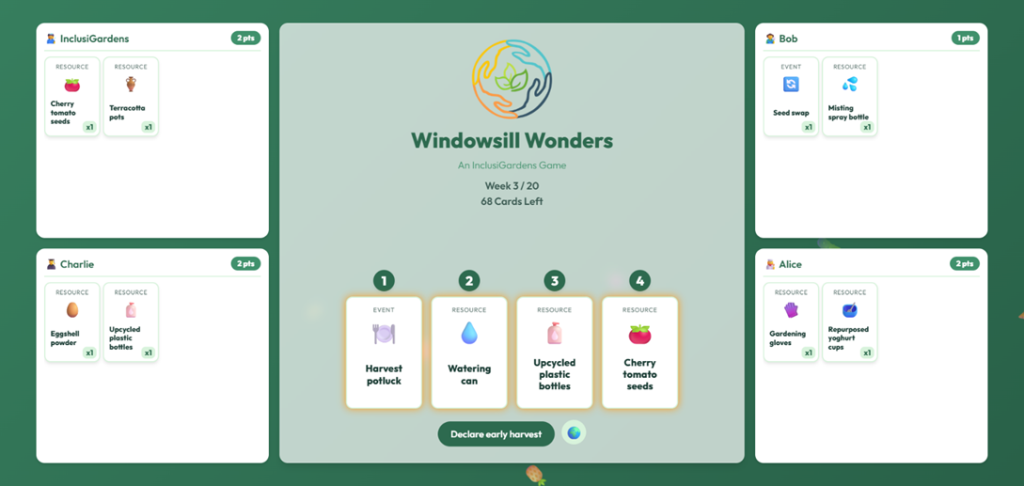
The digital iteration of Windowsill wonders represents a critical step in the curriculum’s gamification strategy, shifting the pedagogical focus entirely from individual assessment and isolated deductive logic to complex, cooperative multiplayer interaction. By requiring the player to actively work alongside three virtual neighbours, the game digitalises the collaborative dynamics, tensions, and triumphs of managing a physical community garden. The core mechanics of collecting specific sets of resources, engaging in structured negotiations for limited supplies, and providing mutual assistance directly operationalise the third core permaculture ethic of fair share – the principle of returning the surplus and distributing vital resources equitably among community members.
This online prototype serves as a vital, accessible bridge for socially isolated or very vulnerable learners. For individuals who may lack the physical mobility to participate immediately in outdoor community gardening, or for those who experience high levels of social anxiety in group settings, the digital environment provides a distinctively safe, structured, and mediated arena to practise crucial life skills such as negotiation, compromise, and cooperative communication. The game mechanics inherently require players to look beyond their own immediate, short-term needs and consider the overarching, collective goal of building the best community garden. This vividly demonstrates that individual success in urban agriculture is intimately and inextricably tied to the health, resilience, and cooperation of the surrounding community network. The flexible, vibe-coded architecture of this specific prototype allows educators to rapidly test different multi-user interaction models and carefully refine the mathematical mechanics of digital resource scarcity before scaling the concepts to the extremely complex, tabletop physical game.
Physical game: Windowsill wonders
Welcome to Windowsill wonders! In this game, you are not competing against each other. You are a team of urban gardeners working together to build the best possible micro-gardens on your windowsills. Your goal is to collect matching sets of gardening supplies to earn points. If your team’s combined points meet the Target score before the season ends, you all win! In front of you is your Windowsill – your play area. You also hold a hand of 4 Planning cards numbered 1, 2, 3, and 4. You will use these to secretly choose which community Resource station you want to visit each week.
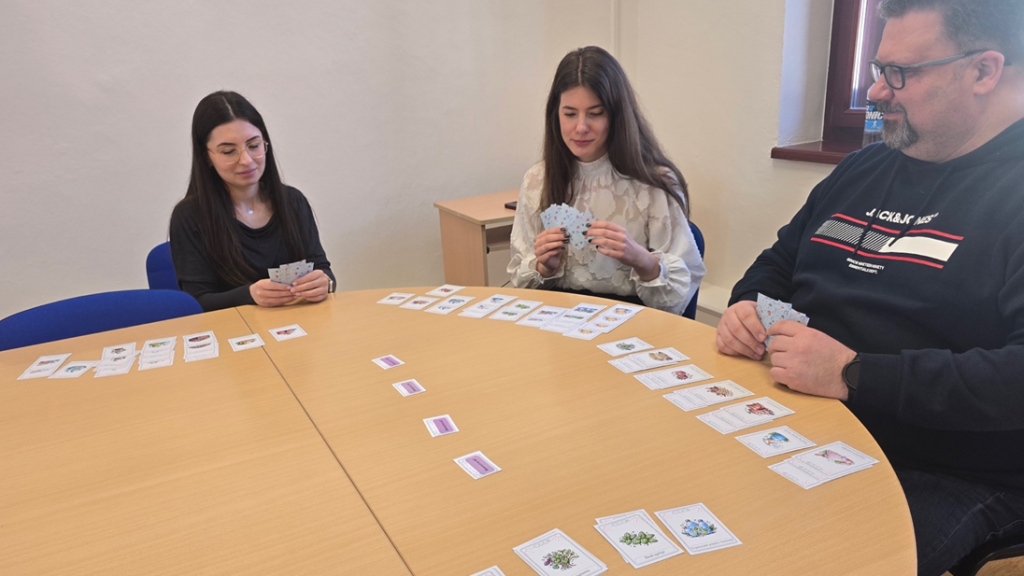
The physical tabletop version of Windowsill wonders represents the culmination of the InclusiGardens curriculum’s gamification plan. It provides a multi-sensory and deeply interpersonal educational experience. By explicitly stating that players are not competing against one another, the game instantly disarms anxiety and establishes a shared, systemic adversary: the relentless passage of time and the mathematical challenge of achieving a collective Target score. This unified objective requires players to completely abandon zero-sum thinking and adopt a holistic systems-thinking approach, perfectly encapsulating the reality of macro-level community gardening.
Game structure and setup mechanics
To facilitate a smooth learning curve, the game utilises a very structured, repetitive turn system. The setup requires minimal physical components:
- Windowsill: The individual player’s board where claimed Resource cards are displayed and grouped into scoring sets.
- Planning cards 1, 2, 3, 4: Utilised for the simultaneous, secret action selection mechanism.
- Resource stations 1, 2, 3, 4: Shared community hubs where new supplies are distributed weekly.
- Garden cards: The central deck driving the economy, containing Resource cards and Special event cards.
- Target score: The collective goal (80, 100, or 120 points) that the entire team must reach.
How to play: The 4 steps of a week turn
The game is played over a maximum of 20 weeks (turns), simulating the biological constraints of a growing season.
- Step 1: Plan your visit: Look at the 4 Garden cards (resources or action cards) in the centre of the table. Secretly take the Planning card from your hand that matches your desired station’s number. Once everyone is ready, flip them over at the same time. This encourages high-level cognitive empathy and perspective-taking.
- Step 2: Claiming resources and negotiations: If you are alone at a station, take the card. If two people pick the same card, negotiate using Rock-Paper-Scissors. The winner takes the desired card; the loser claims the card left behind. This culturally universal, luck-based mechanic completely removes potential for aggressive verbal argumentation.
- Step 3: Crowded stations: If three or four people pick the exact same station, it’s too crowded! The tied players must take back their Planning cards and pick a new station from the ones remaining, visually demonstrating that deep flexibility is an absolute requirement when community infrastructure is strained.
- Step 4: Restock the stations: Once everyone has exactly 1 new card, the week is over. 4 new cards are revealed for the next week.
How to score points
You earn points by collecting matching sets of Resource cards. Keep matching cards grouped together on your Windowsill. The exponential growth model elegantly demonstrates the foundational permaculture principle of synergy.
- 1 card alone = 1 point
- 2 matching cards = 3 points
- 3 matching cards = 6 points
- 4 matching cards = 10 points
Special event cards
Sometimes, you might claim an Event card. Keep these face-up on your Windowsill and use them once to help the team.
- Neighbourly donation: Give one of your cards to a teammate who needs it.
- Seed swap: Trade one card with a teammate (both must agree!).
- Harvest potluck: Everyone passes one card to the person on their left.
- Community assembly: Play this at the start of a turn. For that week only, everyone can talk openly and coordinate which cards they will pick, avoiding Rock-Paper-Scissors entirely!
How to win and the Early harvest strategy
Talk to your team constantly! If you think your combined points add up to the Target score (80, 100, or 120 points), you can declare an Early harvest and win the game immediately. Otherwise, tally up your final score together at the end of the 20th week.
The Early harvest rule serves as a powerful incentive against laziness and complacency, requiring continuous mathematical engagement and proactive communication among all participants. The variable Target scores allow educators to precisely scale the difficulty to ensure a swift, morale-boosting victory in the very first playthrough.
Facilitator implementation guidelines
The successful, impactful deployment of these serious game prototypes – both the vibe-coded digital versions and the complex physical tabletop game – relies heavily on the active, empathetic mediation of the adult educator or facilitator. Gamification within adult education should never exist in a vacuum or be treated as mere entertainment; it must be consistently, verbally anchored to the core learning objectives of the InclusiGardens curriculum.
When introducing the vibe-coded digital online games, facilitators should position them as quick, engaging brain-breaks that bookend more intensive, theoretical classroom sessions. For instance, the Green balcony challenge serves as an ideal, confidence-building warm-up activity immediately prior to beginning Module 3 (Balcony garden design), while the logic puzzles of Green Skyscrapper provide an excellent analytical exercise preceding Module 5 (Composting and zero-waste). Facilitators must be acutely aware of the digital divide and ensure that technological barriers are entirely minimised. They should provide accessible devices if necessary, ensure stable internet connections, or proactively utilise a central projector to play the games collectively as a group if individual hardware is unavailable or if learners lack basic digital literacy.
The implementation of the physical Windowsill wonders game requires a much more dedicated time block and careful facilitation. The educator’s role during this tabletop game shifts dramatically; they must act simultaneously as a strict rules arbitrator and a supportive observational coach. Facilitators should strictly adhere to the following best practices:
- Monitor cognitive load and mitigate overwhelm: Ensure that the complex rules of hidden bidding, RPS resolution, and exponential set scoring are fully understood before the first official turn begins. Facilitators should physically walk the group through a practice week with all Planning cards revealed face-up to completely demystify the mechanics and alleviate any performance anxiety.
- Actively prompt vocalisation: During the silent bidding phase, the facilitator must strictly enforce the rule of silence to preserve the deduction mechanic. However, during the resolution and restocking phases, the facilitator must actively prompt players to articulate their strategies out loud. Asking probing questions such as, Why did you choose to trade that specific seed? or How did you know they were going to play a 2 card? brings subconscious strategies to the forefront of the group’s awareness, cementing the learning.
- Dynamically manage the difficulty curve: Continually assess the group’s emotional dynamic and frustration levels. If players are visibly struggling with the exponential math of the scoring system, the facilitator should smoothly provide a printed visual reference chart. If the group is progressing too easily and the game lacks tension, the facilitator should challenge them with a much higher Target score on subsequent playthroughs to push their cooperative limits.
Most importantly, the conclusion of Windowsill wonders – whether it ends in a triumphant Early harvest or a heartbreaking shortfall at week 20 – must be immediately followed by a structured debriefing session. Gamified learning achieves its absolute maximum pedagogical potential during this critical reflection phase. Facilitators should carefully guide the participants to connect the intense emotions and strategies experienced during the game directly to the real-world personal action plans they develop at the very end of the curriculum. Necessary probing questions during this debrief should, for example, include:
- How did it actually feel when two of you wanted the exact same resource, and how did Rock-Paper-Scissors change that feeling?
- How did the Community assembly card change the way your team operated compared to the silent rounds?
- How can we directly apply the communication strategies and compromises we used to win this game when we approach the city council for a real, physical community garden plot next month?
Practical outlook and pedagogical synthesis
The Prototypes of serious games section encapsulates the innovative, forward-thinking methodology of the InclusiGardens project. By boldly leveraging cutting-edge, low-barrier technologies like vibe coding and natural language AI, the curriculum provides targeted, rapidly deployable digital touchpoints that successfully reinforce complex horticultural knowledge, deductive reasoning, and preliminary cooperative skills. These digital tools serve as the crucial scaffolding that paves the way for the rich, complex, and emotionally resonant interpersonal dynamics facilitated by the physical Windowsill wonders tabletop game.
Together, this suite of prototypes does much more than merely test rote knowledge; they actively, safely simulate the emotional, practical, and social realities of urban micro-gardening in the 21st century. By transforming abstract, often intimidating ecological concepts – such as resource scarcity, fair share, systems thinking, and biodiversity – into tangible, tactile game mechanics like shiny stars, logical deductions, Rock-Paper-Scissors negotiations, and exponential point sets, the curriculum ensures that adult learners of all backgrounds, literacy levels, and physical abilities can deeply internalise these critical lessons. Through the structured, intentional application of play, vulnerable urban populations are not just taught the mechanics of how to grow plants on a windowsill; they are fundamentally equipped with the vital communication skills, practical foresight, and resilient cooperative mindset absolutely necessary to cultivate thriving, inclusive, and sustainable communities in the real world.